
Happy 27th Birthday Hirsh! For years I have wanted to make a decorated chocolate layer cake for Hirsh's birthday, and it wasn't until our wedding that I got all the necessary equipment including my Wilton Decorator Icing set. The cake and icing recipes are from Hershey's and the decorator icing is from Wilton. Although it was a lot of work, it turned out great and I can't wait to make it again for future birthdays and other special occasions.
Chocolate Layer Cake
2 C sugar
1 3/4 C flour
3/4 C Hershey's Cocoa
1 1/2 tsp baking powder
1 1/2 tsp baking soda
1 tsp salt
2 eggs
1 C milk
1/2 C vegetable oil
2 tsp vanilla
1 C boiling water
1. Preheat oven to 350 degrees F.
2. Grease 2 9-inch baking pans with cooking spray. Put wax paper circles on the bottom of each pan and spray again (this will help to prevent crumbing). An easy way to make the circles is to fold a piece of wax paper in quarters and then twice on the diagonal. Make a single cut and then unfold into a circle!

3. Mix all dry ingrediants and then add eggs, milk, oil and vanilla, beating for 2 minutes on medium speed.
4. Stir in boiling water (batter will be thin).
5. Pour evenly into prepared pans and bake at 350 for 30 minutes or until a toothpick comes out clean.

6. Let cool for 10 minutes and then remove from pan and remove wax paper. Cool completely on wire racks with round side (top) facing up.
Chocolate Buttercream Icing
1 stick butter
2/3 C Hershey's Cocoa
3 C powdered sugar
1/3 C milk
1 tsp vanilla extract
1. Melt butter and stir in cocoa.
2. Add powdered sugar and milk alternately, beating to spreading consistency.
3. Stir in vanilla.
4. Frost cake immediately.
Cake Assembly
1. After cake layers are completely cool, level the bottom layer with a knife or cake leveler, to make a completely flat surface. I got this adjustable cake leveler at Michael's for around $3 and it was very helpful. "Sample" some of the cake you cut off...mmm...

2. Frost the top of the bottom layer and place the top layer on top. Try to use the minimum amount of icing to get a good coating to make sure that you have enough icing for the top and the sides.
3. Ice the top and the sides. I got a rotating base, which helps to smooth the icing around the sides.

4. Store the cake in the refrigerator until you are ready to decorate.
Wilton Decorator Icing
1/4 C solid vegetable shortening (Crisco with no trans fat)
1/2 stick butter, room temperature
1/2 tsp vanilla extract
2 C powdered sugar, sifted
1 tbsp milk
1. Cream butter and shortening with electric mixer.
2. Add vanilla.
3. Gradually add powdered sugar, beating on medium speed.
4. Add milk and beat on high speed until light and fluffy.
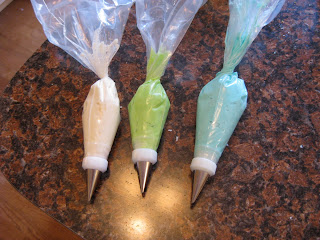
5. Separate into individual containers and add food coloring as desired. The best food coloring to use is solid food color (add dabs with a toothpick and then mix with an icing knife or spoon) since this will not dilute the icing like liquid food coloring.

6. Refrigerate before using (overnight is good).
Cake Decorating
Sometime in the mid 1980's, my mom took a Wilton cake decorating class and bought a set of bags, tips and couplers. She always made my birthday cakes growing up, and I learned to use the set by playing around with the extra icing and making designs on tupperware lids. I slowly progressed to decorating cookies and cakes. I got my own Wilton set as a shower present from my mom, so I am now equipped to do decorating of my own. I have been watching a lot of youtube videos to learn new decorating techniques. I will list the basic steps here, but if you are really interested in cake decorating, I would be more than happy to give lessons. :-)
1. Load decorating bags with desired tips. There are different types of tips for different decorations- round ones of different sizes for writing and dots, "star" tips, "leaf" tips and even "rose tips." For the cake, I used "3" tips for the writing, "2" tips for the detail work, a "16" tip for the small stars and a "21" tip for the big stars and shell border. You can easily switch the tip so don't feel like you have to use only one tip per color.
2. Decorate the cake. It's a good idea to practice a bit on a lid or plate to see what the tip looks like, the effect of different pressure, etc. Use a 45 degree angle for writing and a 90 degree angle for stars. These are the two most basic tips and a great place to start. Make sure to work quickly and put the icing back in the refrigerator if the icing gets to runny.

3. Use the extra icing to practice your technique. I made a plate for my mom and dad who were visiting to wish them "Happy March 20th" (the day that they met 30 years ago). I was trying to practice roses, but the icing was not stiff enough, so they didn't turn out that well...I also still need to master leaves.

4. Wow your friends and family with your homemade, personalized layer cake!
Difficulty: Hard and requires a lot of time and specialized equipment but worth every second.
Debbie's Rating: 10
Hirsh's Rating: 10
Shari and Rick's Rating (aka Mom and Dad): 10
No comments:
Post a Comment