Another toddler muffin recipe-- this time, with hidden vegetables! Shira seems to love these just as much as the banana raspberry muffins. She now eats 1 muffin every day as part of breakfast or a snack. That's my daughter! Muffins are the best!
Ingredients:
2 large carrots, shredded
2 bananas, mashed
1 zucchini, shredded and water pressed out
1/2 C plain or vanilla yogurt
2 eggs
1 C whole wheat flour
1 1/2 tsp baking soda
1/2 C packed brown sugar
1/2 C oatmeal
1/4 tsp salt
1 tsp ground cinnamon
1/4 tsp ground ginger
3 oz raisins
1. Preheat oven to 375 degrees.
2. Mix carrots, banana, zucchini and eggs.
3. In a separate bowl, whisk together flour, baking soda, brown sugar, oatmeal, salt, cinnamon and ginger. Add raisins and stir to coat.
4. Mix dry and wet ingredients gently until just combined.
5. Grease muffin pan with cooking spray. Spoon into 12 regular muffin or 24 mini muffin tins.
6. Bake 22-25 minutes until toothpick comes out clean.
7. Cool 10 min in pan and then remove to cooling rack to cool completely.
Freezes well!
Saturday, January 17, 2015

Sunday, November 30, 2014
Toddler-friendly Whole Wheat Banana Raspberry Oatmeal Mini Muffins
.JPG)
Shira is a great eater and has really mastered the major food groups- fruits, veggies, dairy, and meat, but her meals were getting kind of repetitive (how would you feel about eating fruit and yogurt every morning for breakfast?) and I wanted a good way to add more whole grains. I searched out some healthy muffin recipes that would be toddler friendly- ie. low sugar, low salt, no oil and high whole grains. I found this recipe on allrecipes.com and modified it to make it even healthier. I think it would be a good starter recipe to add whatever berries, or eventually nuts, I have on hand. Shira liked them and I did too!
Toddler-friendly Whole Wheat Banana Raspberry Oatmeal Mini Muffins
Wet Ingredients:
1 egg
1 1/3 C mashed ripe banana
1/2 C brown sugar
1 tsp vanilla extract
Dry Ingredients:
1/3 C whole milk plain yogurt (can substitute applesauce here)
1 C whole wheat flour
1/2 tsp baking soda
2 tsp baking powder
1/4 tsp salt
1 tsp ground cinnamon
1 C quick cooking oats
3/4 C raspberries, cut into halves or quarters
Preheat oven to 350 degrees. Whisk together dry ingredients and wet ingredients in two separate bowls. Gently fold dry ingredients into wet ingredients. Lightly spray 12 regular or 24 mini muffin cups with non-stick spray and divide batter evenly. Bake at 350 degrees for 18-20 minutes until toothpick comes out clean. Cool on wire rack.
Sunday, May 20, 2012
Potato Chip Cookies

At breakfast one morning I was reading my Cook's Country magazine and found these cookies. Although they sounded a bit strange, the combination of salty and sweet definitely appealed to me. Cook's Country gives you not only the recipe but how they came up with the recipe. I thought something interesting that they mentioned was how they tried many different types of potato chips. Full fat potato chips gave the cookies an undesirable "oily" taste and made the edges brown too quickly. They opted to go with 40% less fat chips, specifically the Cape Cod brand. This was also the first time I used parchment paper and loved it. It made clean up super easy and the cookies did not stick at all (something that has been a problem lately on my aging non-stick cookie sheets). The cookies turned out pretty well...kind of like sugar cookies, but with extra crunch from the chips. They would definitely be fun to make again.
Potato Chip Cookies
3/4 C all purpose flour
1/2 C crushed reduced fat potato chips (Cape Cod 40% reduced fat chips are recommended)
1/4 C pecans, toasted and chopped fine
1/4 tsp salt
1 stick butter, softened but cool, cut into 8 pieces
1/4 C powdered sugar
1/4 C granulated white sugar
1 egg yolk
1/2 tsp vanilla extract
1. Preheat oven to 350 degrees. Line 2 large baking sheets with parchment paper.
2. Combine flour, chips, pecans and salt in a bowl, set aside.
3. Cream butter, powdered sugar and granulated sugar, beating on medium high speed until light and fluffy.
4. Add egg yolk and vanilla and beat until combined.
5. Slowly add flour mixture, beating on low speed until combined.
6. Roll dough into 1 inch balls (I did 1.5 inch balls and the cookies got very big!). Lay out on parchment paper 3 inches apart and press down into 1/4 inch high flat circles with lightly floured fingers.
7. Bake ~10 minutes at 350 degrees or until lightly browned on edges.
8. Let cool slightly and then transfer to wire rack to cool completely. Enjoy!
Makes 16 large cookies or 24 regular cookies.
Sunday, April 29, 2012
Double Chocolate Biscotti

In honor of Priyanka and Reza's birthdays at work they requested "something chocolate" for their group meeting birthday treat. I always want to try new recipes, so I decided that biscotti would be a fun thing to try and would be perfect for our afternoon group meeting. Interestingly, very few of my group members had heard of biscotti, so I looked up the official definition and found that biscotti is of Italian origin and by definition must be "twice baked." I didn't want my biscotti to be quite as hard as traditional biscotti so I modified the baking directions a bit. If I had more time I would have melted some white chocolate and drizzled it on the side to make them prettier. I think these would make a great holiday gift, are really easy to make and can be modified by adding nuts, white chocolate chips, etc.
Double Chocolate Biscotti
1/2 C butter, softened
2/3 C white sugar
1/4 C cocoa powder
2 tsp baking powder
2 eggs
1 3/4 C AP flour
3/4 C semisweet chocolate chips
1. Cream butter and sugar until light and fluffy.
2. Gradually beat in cocoa and baking powder, then beat on medium high speed for 2 minutes.
3. Beat in eggs one at a time.
4. Stir in flour at low speed until combined and then stir in chocolate chips.
5. Cover and chill in the refrigerator for about 10 minutes.
6. Preheat oven to 375 degrees. Line baking sheet with foil and spray with non-stick spray.
7. Divide dough in half and form into two 9-inch logs. Pat down slightly to about 1 inch thickness.
8. Bake for 20-25 minutes until a toothpick inserted in the center comes out clean.
9. Turn oven off and cool on cookie sheet for 5 minutes.
10. Carefully cut into 1/2 in slices using a sharp knife and turn each slice so cut side is facing up.
11. Set oven to 325 degrees and bake again for 5 minutes.
12. Remove from oven, carefully flip each slice to the other side and bake an additional 5-7 minutes.
13. Place on cooling rack to cool completely. Store in air tight container.
Difficulty: Medium
Debbie's Rating: 8.5
Sunday, April 8, 2012
Can't Believe They're Kosher for Passover Brownies

Passover Fudge Brownies
4 eggs
2 C sugar
1 C melted butter, slightly cooled
½ tsp salt
6 tbsp matzah cake meal
1 C cocoa
1 cup ground nuts (optional)
KP non-stick spray
1. Preheat oven to 375 degrees.
2. Sift matzah cake meal and cocoa. Set aside.
3. Beat eggs on medium high speed. Add sugar gradually and beat well.
4. Beat in melted butter and salt.
5. Add dry ingredients slowly, beating until fully combined. Stir in nuts.
6. Pour into a greased 9” x 13” metal pan.
7. Bake at 375 degrees for 20-25 min until a toothpick comes out clean.
Difficulty: Easy
Debbie's Rating: 9
Hirsh's Rating: 9 (10 on a passover scale)
Thursday, March 22, 2012
Chocolate Mint Cookies

Well, it has been a while since I blogged- almost a year! Work has been quite busy, but I felt inspired tonight, so here you go, a new blog post!! While I haven't been blogging for a while, I still have been trying new recipes and having fun in the kitchen. So hopefully I will make a few of the new recipes again and post them soon. :-)
One of the best avenues for trying new recipes this year as been my group meeting birthday tradition. Every time someone in my subgroup has a birthday, I ask them what they want and make it for group meeting that week. This past year I made: apple walnut cookies, almond cookies, peanut butter fudge, coffee muffins, banana nut muffins and raspberry/blueberry muffins just to name a few (can you tell we switched from a pm meeting to am meeting?) Well, it's been a full year and I'm back to the beginning with Shufeng. Shufeng really loves the birthday treat idea and actually picked this recipe for me to make. I was pretty skeptical since I am used to the creaming method for cookies and this recipe actually melts the butter, but the 600 positive reviews on allrecipies.com encouraged me to make them anyways (with a few tweaks of course). I have to say, I was quite impressed with how they turned out!! I would call them the grown up version of thin mints. :-)
Chocolate Mint Cookies
3/4 stick butter (6 tbsp)
3/4 C packed brown sugar
1 tbsp water
1 C semisweet chocolate chips
1 egg
1/8 tsp mint extract
1 1/4 cups all-purpose flour
5/8 tsp baking soda
1/4 teaspoon salt
18 Andees mints, broken in half
1. Melt butter in a small saucepan over low heat.
2. Stir in brown sugar and water until combined.
3. Add chocolate chips and stir until they begin to melt. Take off heat and stir until chips are completely melted.
4. Pour mixture into a mixing bowl and let stand at room temperature for 10 minutes to cool slightly.
5. Combine flour, salt and baking soda in a separate bowl.
6. Beat egg and mint extract into chocolate mixture on high speed.
7. Add dry ingredients and mix on low speed until combined.
8. Scrape dough down into center of bowl, cover and refrigerate for at least 1 hour.
9. Preheat oven to 350.
10. Use a cookie scoop to portion dough into balls about 1 inch in diameter.
11. Bake for 8 minutes.
12. Place 1/2 Andees mint on each cookie and bake 1 more minute.
13. Swirl mint and then remove cookies from cookie sheet.
14. Cool to room temperature and then refrigerate briefly to set topping.
15. Enjoy!
Makes ~3 dozen
Friday, April 8, 2011
Healthy Lemon Raspberry Muffins

Always on the search for fun, healthy muffin recipes, I decided that I wanted to try raspberry muffins. I found this recipe online and modified it a bit (the original recipe mixed everything in a food processor which turned out, as I guessed to be very unnecessary). The muffins turned out really well and I will definitely make them again, maybe substituting some of the oil with yogurt or apple sauce to make them even healthier.
Healthy Lemon Raspberry Muffins
1 lemon
1/2 C sugar
1 C nonfat buttermilk, or 1 tbsp lemon juiced mixed in 1 C skim milk (I used this substitution since I forgot to buy buttermilk)
1/3 C canola oil
1 egg
1 tsp vanilla extract
1 C whole-wheat flour
1 C all-purpose flour
2 tsp baking powder
1 tsp baking soda
1/4 tsp salt
1 small container fresh raspberries
1. Preheat oven to 400.
2. Combine zest of lemon, sugar, buttermilk, oil, egg and vanilla in one bowl. In a separate bowl combine flour, baking powder, baking soda and salt.
3. Add wet ingredients into dry ingredients and fold in until just combined.
4. Gently fold in raspberries.
5. Bake 15-20 minutes until golden. Cool 5 minutes before turning out of pan. Makes 12 muffins.

Difficulty: Easy
Debbie's Rating: 9
Sunday, March 27, 2011
Apple Walnut Spice Cookies

Apple Walnut Spice Cookies
2 C all purpose flour
1 tsp baking soda
1 tsp ground cinnamon
1 tsp ground cloves
1/2 tsp ground nutmeg
1/2 tsp salt
1/2 C (1 stick) butter, softened
1 1/2 C packed brown sugar
1 egg, beaten
1 cup chopped walnuts
1 cup peeled, chopped granny smith apples
1. Preheat oven to 350 degrees.
2. Sift together flour, baking soda, cinnamon, cloves, nutmeg and salt.
3. Cream butter and sugar until fluffy. Add egg and beat to combine.
4. Gradually add dry ingredients to butter mixture until fully incorporated.
5. Fold in apples and walnuts by hand.
6. Form dough into 1 tbsp balls by hand (dough was fairly crumbly, so press the balls together)
7. Bake at 350 for 12-14 minutes until golden. Cool on a wire rack.
8. Enjoy! (Note: Best to eat within 1-3 days as the apples start letting out moisture)
Difficulty: Medium
Debbie's Rating: 9
Shufeng's Rating: "It just tastes far beyond what I can imagine"
Wednesday, March 9, 2011
Ice cream cake
 Hirsh and I wanted to make a fun dessert for our dinner club so Hirsh thought of making a homemade ice cream cake. I searched the internet for assembly instructions and found some really strange suggestions like making the cake out of ice cream sandwiches and cutting ice cream in half with dental floss. After more searching, I found these directions. While it was pretty time consuming due to all of the freezing steps, it turned out really well and tasted really good! I know we will be making this one again, and with different cake, ice cream and icing flavors, the possibilities are endless!
Ice Cream Cake
1 recipe or mix for 9 in round layer cake
1/2 gallon ice cream of choice (we used Edy's slow churned cookies and cream)
Icing and topping of choice
(layer cake and icing recipes here)
1. Soften ice cream at room temperature until soft, but not melted.
2. Line 1 round cake pan with saran wrap, enough to cover ice cream.
3. Press ice cream into pan with a flexible spatula and cover with saran wrap. Put ice cream in freezer to harden in pan.
 4. After a few hours, take ice cream wrapped in saran wrap out of pan and store flat in the freezer. Make layer cake in 2 cake pans. Cool completely, wrap each layer in saran wrap and freeze for 3+ hours.
 4. After a few hours, take ice cream wrapped in saran wrap out of pan and store flat in the freezer. Make layer cake in 2 cake pans. Cool completely, wrap each layer in saran wrap and freeze for 3+ hours.
5. Make icing immediatley before you are ready to assemble the cake.
6. Place cake layer, ice cream layer and second cake layer in a stack. Trim off any excess ice cream with a sharp knife. Working VERY quickly, frost the cake and decorate.
 7. Put cake back in freezer until ready to serve.
 7. Put cake back in freezer until ready to serve.
8. Take out for a few minutes and then slice and serve!
 Difficulty: Medium
Debbie's Rating: 10
 Difficulty: Medium
Debbie's Rating: 10
Hirsh's Rating: 9.75 (When asked why he didn't rate it a 10, he said, "It's not a 10 because we could have added peanut butter" when I asked "where, in the ice cream?" he responded, "no everywhere!")
Sunday, March 6, 2011
Supper Club at the Goldberg's
 Recently we started a "supper club" with a some friends. Each couple takes a turn hosting and makes a big feast for everyone. Hirsh and I brainstormed the menu and decided on brisket, kugel and carrots for the main course. It was definitely a lot of work, but we were able to make most of it the day before and all of the "mmm's" made it very worthwhile. The brisket and kugel recipes I got from my mom and the carrots were from my cousin Marcy. We even got to use my grandma's china and our flatware from our wedding, which made it even more fun and special.
 Yummy Brisket
This was our first time making brisket and it turned out to be a lot easier than we thought and tasted delicious! We will definitely make this recipe again.
4-6 lbs brisket (get several smaller flat cut briskets for the best results)
3 packets lipton onion soup
1 1/2 C ketchup
3 C gingerale
1 large covered roasting pan
1. Preheat oven to 350 degrees.
2. Arrange briskets in a large roasting pan.
1. Combine 2 packets onion soup mix, 1 cup ketchup and 2 cups gingerale with a whisk. Pour over briskets.
4. Bake covered at 350 degrees for 2 to 2.5 hours, basting every 30 minutes.


5. Cool until room temperature and then put in refrigerator and chill overnight.
6. Remove any solidified fat (ew gross!) and remove brisket onto a cutting board.
7. Slice against the grain, removing fat and put in a casserole dish in the refrigerator.


8. An hour before you are ready to reheat, take the brisket out of the refrigerator to come to room temperature. Combine 1/2 C ketchup, 1 C gingerale and one onion soup packet to make additional sauce.
9. Reheat at 350 degrees for 1 hour.
10. Serve and enjoy! Makes great leftovers if you have any (which we didn't!)
Sweet Cinnamon Kugel
A classic Jewish dish, this kugel goes great with beef or chicken. Not the healthiest side dish, but for holidays and special occasions it's great.
1 pound (16 oz.) of medium egg noodles, cooked
8 eggs, separated; Use 6 yolks, 8 whites
1 cup sugar
4 oz. orange juice
2 tsp. vanilla
2 sticks butter, softened at room temperature
1 C crushed corn flakes
4 tbsp sugar
2 tsp cinnamon
Butter
1. Cream sugar and margarine.
2. Add 6 egg yolks, orange juice and vanilla and mix until combined.
3. Add batter to cooked noodles and set aside.
4. Clean bowl well and whip 8 egg whites to medium peaks (white, puffy eggwhite cloud should fill about 3/4 of the bowl on a kitchenaid mixer.)
5. Carefully fold egg whites into noodles until just combined.
6. Grease 9x13 glass baking dish with butter and add noodles. If you can't fit all of the noddles in, that's okay.
7. Top with crushed corn flakes and sprinkle with cinnamon sugar mixture. Dot with butter.


8. Bake uncovered for 45-50 minutes.
9. Can be stored for 1 day in the refrigerator. Bring to room temperature and then reheat at 350 degrees for 50-60 minutes.
10. Cut in squares and serve.
Orange Ginger Carrots
This recipe was super easy to make an a fun veggie side dish that is different than traditional green beans or broccoli.
2 pounds carrots, peeled, cut diagonally into 1/4-inch-thick rounds
1 C orange juice
2 tbsp butter
2 tbsp brown sugar
1/2 tbsp grated peeled fresh ginger
1. Combine carrots, orange juice, sugar, butter and ginger in a large skillet over medium high heat.
2. Heat until boiling, cover and cook for 3 minutes.
3. Uncover and simmer until liquid glazes carrots and carrots are tender, about 10 minutes.
4. Season with salt and pepper if desired and serve.
Tuesday, February 15, 2011
Herb Roasted Chicken and Creamy Parmesan Basil Orzo


I found this recipe for herb roasted chicken online and it was super easy and delicious-- I would definitely make it again (on a weekend when we have time!) I paired the chicken with creamy parmesan basil orzo and steamed asparagus. And to make it extra special, I served everything on my grandma's china that she gave us for our wedding. All and all a very successful Valentine's day dinner!


Herb Roasted Chicken Breasts
2-4 chicken breasts on the bone, skin on
3 tbsp olive oil
1 tbsp minced onion
1 clove crushed garlic
1 tbsp dried thyme
1/2 tsp dried rosemary
1/4 tsp ground sage
1/4 tsp dried marjoram
1/2 tsp kosher salt
1/2 tsp ground black pepper
1. Combine oil and all seasonsings. Brush on chicken breasts on all sides. Put chicken in a ziplock bag and let marinate in the refrigerator for a few hours.
2. Preheat oven to 425.
3. Line a glass baking dish with foil and place chicken breasts, skin side up in the pan.
4. Cover with foil and bake for 25 minutes, basting once.
5. Remove foil, baste and cook for an additional 20 minutes, uncovered.
6. Baste with released juices and serve!
Difficulty: Easy
Debbie's Rating: 10
Hirsh's Rating: 9.5
Creamy Parmesan and Basil Orzo
1C orzo
1 tbsp buter
1 1/4 C low sodium chicken broth
1 1/4 C water
1/4 C grated parmesan
2 tbsp fresh chopped basil
Salt and pepper, to taste
1. Melt butter in a saucepan over medium heat and cook orzo for 3 minutes, stirring constantly.
2. Add water and chicken broth. Bring to a boil and then reduce heat to low.
3. Simmer for 15 minutes, stirring occasionally until orzo is cooked and all liquid is absorbed.
4. Off heat, stir in parmesan and basil and salt and pepper to taste.
5. Serve immediately.
Difficulty: Easy
Debbie's Rating: 9
Hirsh's Rating: 9
Thursday, January 6, 2011
Cranberry Walnut Bread


I wanted to do something special to thank the people at UMB who helped me the most during my graduate career- my advisor, Dr. Swaan, the woman in charge of ordering, Yelena and the department accountant, Gerry. Since I was well known as a baker, I thought it would be nice to bring them homemade bread on my last day at school. I got an awesome mini loaf pan for my bridal shower, so I thought this was a great opportunity to use it. I made my mom's cranberry walnut bread recipe and made three mini breads for the gifts. The breads turned out great and they really appreciated the home-baked presents!
Cranberry Walnut Bread
Zest of 1/2 medium orange (about 1 tsp)
3/4 C orange juice (fresh squeezed or purchased)
1 egg
2 tbsp vegetable oil
2 C all-purpose flour
3/4 C sugar
1 1/2 tsp baking powder
1 tsp salt
1/2 tsp baking soda
1 C coarsely chopped fresh cranberries
1/2 C chopped walnuts
1. Preheat oven to 350 degrees.
2. Combine egg, oil, orange juice and orange zest in one mixing bowl.
3. In a separate mixing bowl, combine sugar, baking powder, salt, baking soda and flour.
4. Add dry ingredients to wet ingredients, mixing until just combined (over mixing will produce more gluten, toughening the bread).
5. Fold in cranberries and chopped walnuts.
6. Turn into lightly greased 8x4x2-inch loaf pan on or three 6x3x2-inch loaf pans.
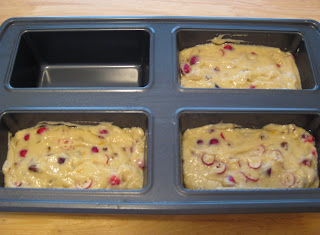
7. Bake at 350 degrees for 50-60 minutes for large pan and 35-40 minutes for smaller loaf pans.
8. Cool for 10 minutes in pan and then remove from pan and cool completely.

9. Enjoy! Small loaves are great for gifts!
Difficulty: Medium
Debbie's Rating: 9
Thursday, December 30, 2010
Snickerdoodles

One of my favorite types of cookies to make during the holiday season is Snickerdoodles. These simple cinnamon sugar cookies have a funny name but are very tasty! This year, I made a batch for my graduation party and everyone seemed to like them. The recipe is from bettycrocker.com and makes either 2 dozen large cookies or 4 dozen smaller cookies.
Snickerdoodles
1 1/2 C sugar
1/2 C butter, softened
1/2 C vegetable shortening (no trans fat!)
2 eggs
2 3/4 C flour
2 tsp cream of tartar
1 tsp baking soda
1/4 tsp salt
1/4 C sugar
2 tsp ground cinnamon
1. Preheat oven to 400 degrees.
2. Beat 1 1/2 C sugar with butter and vegetable shortening until fluffy.
3. Add eggs one at a time and beat to combine.
4. In a separate bowl combine flour, cream of tartar, baking soda and salt.
5. Add dry ingredients slowly and mix to combine.
6. Roll into 1 1/4 inch (large cookies) or 3/4 inch (small cookies) balls and roll in cinnamon sugar mixture. Press down slightly to flatten.

7. Bake 8-10 minutes until set and remove to wire rack to cool.

8. Enjoy! The also freeze well if there are any left!
Difficulty: Medium
Debbie's Rating: 10
Monday, December 20, 2010
Thanksgiving Stuffing

This year it was my job to make stuffing for our 22-person Thanksgiving. I knew immediately to go to my cousin, Marcy for the recipe. Not only is Marcy a great cook, I always remember her stuffing as being very tasty! With her directions and suggestions I succeeded in making from-scratch stuffing that was delicious and enough to feed our large family! Although it was definitely a lot more work than using a mix or pre-made bread cubes, it was definitely worth the effort!
Thanksgiving Stuffing (for a crowd)
Three loaves high quality bread (I used Italian, Cibatta and hearty wheat for a nice mix)
6 tbsp butter
3 medium onions, chopped
2 bunches celery, chopped
1 package parsley, leaves only, chopped
1 package fresh sage, chopped
1 tsp dried sage
32 oz chicken stock (I used Nature's Promise Organic Stock)
Salt and pepper
1. Cut the bread into small cubes and toast in a single layer on cookie sheets at 300 degrees for 15 minutes, tossing twice until dry.

2. Cool cubes and transfer 3/4 of cubes to a large bowl or stock pot. Save 1/4 just in case you make the stuffing too moist or freeze for later use.
3. Melt butter in a large saute pan and saute celery and onion for a few minutes.
4. Add chopped parsley, sage, dried sage, salt and pepper and continue to saute until veggies are golden.

5. Add veggies to bread cubes and toss to combine.
6. Add chicken stock until bread cubes are moistened, but not soggy (3-4 cups).

7. Press into buttered casserole dish (I used my 9x13 lasagna pan since it has high sides).
8. Bake for 45 minutes at 350 covered and then an additional 15 minutes uncovered. (Since I was going somewhere I pre-baked for 30 min at my house, 30 min at 350 plus 15 uncovered).
9. Serve. Feeds a lot!
Difficulty: Hard (not really hard, just a lot of work)
Debbie's Rating: 10
Family Rating: Great!
Wednesday, December 15, 2010
Creamy Pasta with Lemon Pepper Chicken

I found this recipe for creamy pasta with lemon pepper chicken in the tear out "30 minute meal" section of my cook's country magazine. I thought it would be a good weeknight meal, so I decided to try it out. The creamy sauce was very similar to the ricotta pasta I already make, so nothing too exciting there, but the chicken was excellent! I really liked the lemon pepper sauce. I would make this again, maybe even doubling the sauce and using it to coat the pasta instead of the cream sauce. Or the chicken would be great over a salad as well!
Creamy Pasta with Lemon Pepper Chicken
2-3 thin sliced chicken breasts (I got tired of pounding chicken, so I buy thin sliced now for skillet preparations)
Salt and pepper
2 tbsp olive oil
2 garlic cloves, minced
Zest of 1 lemon
Juice of one lemon
8 oz spaghetti or other long noodle
1/2 C parmesan
1/2 C ricotta
Dried parsley
1. Bring water to boil for pasta.
2. In the meantime, season chicken with salt and pepper.
3. Heat 1 tbsp olive oil in skillet over medium high heat and cook chicken about 4 minutes per sized until cooked through. Transfer to cutting board and tent with foil. After resting for 5 minutes, slice crosswise.
4. Add an additional tbsp oil to skillet and return to medium heat. Cook garlic and several grinds of black pepper until fragrant, about 30 seconds.
5. Add lemon juice and simmer until reduced to about 1 tablespoon.
6. Add chicken strips back to pan and off heat, toss to coat. Cover to keep warm until pasta is ready.

7. Boil pasta according to package directions. In meantime, combine ricotta, parmesan, parsley and lemon zest in a medium bowl. Add about 1/2 C pasta water to thin to sauce consistency.
8. Toss sauce with pasta and serve with chicken on top.
Difficulty: Medium
Debbie's Rating: 10 for the chicken, 8 for the pasta/ sauce
Hirsh's Rating:
Saturday, December 11, 2010
Classic Cheddar Cheese Ball


Classic Cheddar Cheese Ball
2 C shredded extra sharp cheddar cheese
8 oz cream cheese, softened (I used 1/3 less fat)
2 tbsp mayonnaise (I used light)
1 tbsp Worcestershire sauce
1 garlic clove, minced
1/4 tsp cayenne pepper
1/2 C toasted sliced almonds
1. Combine all ingredients except almonds in the food processor and process until smooth.
2. Place mixture in the center of a sheet of plastic wrap. Grab 4 corners and twist, forming cheese ball into a sphere.

3. Refrigerate until firm about 3 hours (or you can make the day before).
4. Once firm, unwrap and roll in almonds (Note, to toast almonds, toss in empty skillet over medium heat until golden and aromatic)
5. Serve with crackers!
Difficulty: Easy
Debbie's Rating: 10. I might use a little less Worcestershire sauce next time as the flavor was strong.
Goldberg Family Rating: Everybody loved it!
Friday, December 3, 2010
Pumpkin Chocolate Chip Cookies

As Fall is the season for everything pumpkin, I thought I would share this recipe for pumpkin chocolate chip cookies. This year I made them for Apple Butter, an annual event with the Barnes family devoted to making a giant cauldron of apple butter, being outside and enjoying great company and great food. Since it makes a lot, I saved some and put them out as part of my defense spread as well. They were a hit at both events. The pumpkin makes them a little different than traditional chocolate chip cookies and really soft. Thanks to my mom for the recipe!
Pumpkin Chocolate Chip Cookies
2 sticks (1 C) butter, room temperature
3/4 C brown sugar
3/4 C white sugar
1 egg
1 tsp vanilla
2 C flour
1 C quick oats
1 tsp baking soda
1 tsp cinnamon
1 C pumpkin
1 1/2 C semi sweet chocolate chips
1. Cream butter and sugars until fluffy.
2. Add egg and vanilla and beat well.
3. Combine flour, oats, baking soda and cinnamon in a separate bowl.
4. Stir dry ingredients into butter/ sugar mixture alternately with pumpkin.
5. Fold in chocolate chips.
6. Refrigerate dough for 1 hour up to overnight.
7. Drop by tablespoons on a cookie sheet and bake for 13 minutes at 350 degrees (a cookie scoop is very useful for this-- just like an ice cream scoop, but smaller).


8. Cool for one minute and then remove from cookie sheet and cool completely on wire rack.
Makes 4-5 dozen. Freezes well.
Difficulty: Medium
Debbie's Rating: 10
Wednesday, November 17, 2010
Healthy Pumpkin Spice Muffins

Healthy Pumpkin Spice Muffins
1 C sugar
2 eggs
1/4 tsp baking powder
1 tsp baking soda
3/4 tsp salt
1/2 tsp cloves
1/2 tsp nutmeg
1/2 tsp cinnamon
1 C whole wheat flour
2/3 C white flour
1/4 C oil
1/4 fat free vanilla yogurt
1/2 C cold water
1 C canned pumpkin
1. Preheat oven to 325 degrees.
2. Combine all dry ingredients.
3. Add wet ingredients and mix until just combined.
4. Line muffin tins with muffin cups or simply grease.
5. Fill muffin cups about 3/4 full and then bake for 40 minutes.
6. Cool and remove from muffin tins, makes 12 muffins.

Difficulty: Easy
Debbie's Rating: 10
Monday, November 8, 2010
Caramel Pecan Ice Cream

When I got my Kitchen Aid ice cream maker attachment, I noticed that the instruction booklet had a recipe for carmel pecan ice cream. Unlike the other ice cream recipes in the booklet which were made with heavy cream, eggs and half and half (and often had well over 20 g fat per serving) this recipe was made with whole milk and only had 3.5 g fat per serving. I figured that the creaminess and thickening came from the jello pudding mix rather than the cream. Since it seemed like a perfect fall flavor, I decided to make it for dessert when our friends Kim and Tom came over. The texture was a little different than traditional ice cream, but the flavor was great (especially since it was "low" fat!) and I would definitely make it again.
Caramel Pecan Ice Cream
3 1/2 C whole milk
1 can sweetened and condensed milk
1 C warmed caramel butterscotch topping
1 packet instant vanilla pudding
1 tsp vanilla
1 cup chopped pecans
1. Combine all ingredients except the pecans and whisk until pudding mix is dissolved.
2. Refrigerate at least 6 hours, preferably overnight.
3. Pour into ice cream maker and churn for 20-25 minutes.
4. Add chopped pecans in last minute of churning.
5. Freeze overnight to complete hardening process.
6. Enjoy!
Difficulty: Medium
Debbie's Rating: 9
Thursday, November 4, 2010
Spinach and Ricotta Quiche

Quiche is a fun "fancy" dish that is actually pretty easy to make. It's also great to make for company because there is no last minute prep, so you can entertain your guests until it is ready to come out of the oven! I got this recipe for spinach and ricotta quiche from my mom, and made it for our friends Kim and Tom when they came over for dinner.
Spinach and Ricotta Quiche
1 box chopped spinach
1 egg
1 medium onion, chopped & sautéed
2 tbsp butter
1 9-inch frozen pie crust
15 oz. ricotta (I used part skim)
1. Preheat oven to 350 degrees.
2. Thaw pie shell for 15 minutes.
3. Pierce bottom and sides of pie shell with a fork.
4. Bake pie shell in oven at 350 degrees for about 15 minutes until slightly brown.
5. In the meantime, saute onion in 2 tbsp butter.
6. Add onion to thawed, drained spinach, egg, and ricotta and season with salt and pepper and mix to combine.

7. Place filling in pie shell and bake at 350 degrees for 1 hour. Make sure to cover the edge of the crust with foil so it does not burn.

Difficulty: Easy
Debbie's Rating: 9
Subscribe to:
Posts (Atom)