Tuesday, March 30, 2010

Farfel Apple Kugel

For Passover this year, I made a Farfel Apple Kugel for the first seder. My mom used to make it for Passover and I really love it. Since Hirsh doesn't like anything kugel-y, I was so happy that I got to make it for the seder. It is a pretty sweet dish, but it goes well with chicken or brisket and it is a great alternative to potatoes for a starchy side.

Apple Farfel Kugel
(I doubled it for a large crowd, but this is the normal dinner recipe that serves 6-8)
3 cups matzo farfel (cover with cold water)
3 eggs
1/2 tsp salt
1 tsp cinnamon
3/4 C sugar
3 Granny Smith Apples, peeled, cored, quartered and sliced thin
1/4 C raisins
3 tbsp KP vegetable oil

1. Combine eggs, salt, cinnamon and sugar in a large bowl.
2. Cover matzah farfel with cold water, and then drain immediately, pressing out excess moisture. Add to egg mixture and toss to coat.
3. Peel, core, quarter and thinly slice 3 granny smith apples. Add to mixture. Conveniently, my mom and dad bought us an apple peeler/slicer/corer gadget. It is really fun to use and makes preparing the apples really fast. It makes apple rings which are easily quartered with a knife and added to the kugel. It's also useful to peel potatoes if you take off the coring/ slicing attachment.

4. Stir in raisins and oil.

5. Put in greased 2 qt casserole dish and bake for 45 minutes uncovered. (For a double recipe, I used a Hefty Aluminum Lasagna pan and baked covered for 25 minutes and uncovered for an additional 30 minutes).
6. Serve. Can be saved and reheated at 350 degrees, covered for 45 min- 1 hour.

Difficulty: Medium
Debbie's Rating: 10
Hirsh's Rating: Hirsh doesn't do kugel.
Hirsh's Mom's Rating: Delicious, tastes like a dessert!
Co-worker's Rating: (I brought in leftovers to give people a taste of Passover) Gone in less than an hour and got rave reviews!

Friday, March 26, 2010

Bazinga Bowties with Chicken and Spinach

While flipping through the BJ's magazine one day, Hirsh found a recipe for "Lemon Chicken Bowtie Pasta" that looked really good. Since Hirsh has never actually picked a recipe out of anywhere before, I decided to make it for him for his special birthday dinner. We both thought that the name was kind of lame, so we decided to rename it. It definitely has a "zing" from the lemon and dijon mustard so I suggested "Lemon Zinger Bowties with Chicken and Spinach." Hirsh thought that seemed silly sounding (Lemon Zinger is actually a Celestial Seasonings tea!), but I still wanted to incorporate "zing" into the name. So, I decided to use "Bazinga" instead. For those "Big Bang Theory" devotees out there (great show!) you know "Bazinga" well, but for the rest, it's a fun word that the main character Sheldon likes to add after a joke or insult.

Bazinga Bowties with Chicken and Spinach
6 oz farfalle (bowtie) pasta
1 6-oz bag baby spinach
1 garlic clove, minced
Olive oil
2 skinless, boneless chicken breasts
2 tbsp butter
2 tbsp flour
Cayanne pepper
3/4 C low sodium chicken broth
1/4 C milk
Salt
Pepper
Juice of 1 lemon
1 tsp dijon mustard

1. This is a fast moving dish, so prepare all ingredients beforehand. Cube chicken in 1/2-3/4 inch cubes, put lemon juice and mustard in a small bowl, put 2 T flour sprinkled with a few shakes of cayanne pepper in another bowl, measure milk and broth in a 1C measuring cup, put 2 T butter in a stainless steel sauce pan and put garlic and 1 tsp olive oil in a non-stick skillet. You are ready to go!
2. Saute garlic in oil over medium heat, and then add spinach a little at a time until cooked. Transfer to a plate.
3. Start water boiling for pasta.
4. Add more olive oil to the skillet and cook chicken cubes until brown and cooked through, set aside.
5. Add pasta to boiling water and cook according to package directions (Barilla is 11 minutes).
6. In the meantime, melt butter in saucepan and whisk in flour/ cayanne pepper mixture. Whisk continuously for about 4 minutes over medium heat to make a roux. It will be darker than normal because of the cayanne pepper, but you will know when it is done when it achieves a smooth texture and starts to darken.
7. Slowly add milk/ broth mixture, whisking continuously. Cook over medium low heat until sauce thickens (about 5 minutes). Add salt and pepper to taste.
8. Add lemon and dijon mustard to sauce, whisking in quickly.
9. Drain pasta and add back into pot with spinach and chicken. Toss to combine and then pour sauce over and toss to coat.
10. Serve! Makes 2 dinner portions and 2 lunch portions.

Difficulty: Medium-Hard (a lot going on, hard if you have never made a roux before)
Debbie's Rating: 9.5
Hirsh's Rating: 8.5 - a little too "mustardy" for him...I will probably reduce to 1/2 tsp next time.


Thursday, March 25, 2010

Chocolate Layer Cake

Happy 27th Birthday Hirsh! For years I have wanted to make a decorated chocolate layer cake for Hirsh's birthday, and it wasn't until our wedding that I got all the necessary equipment including my Wilton Decorator Icing set. The cake and icing recipes are from Hershey's and the decorator icing is from Wilton. Although it was a lot of work, it turned out great and I can't wait to make it again for future birthdays and other special occasions.

Chocolate Layer Cake
2 C sugar
1 3/4 C flour
3/4 C Hershey's Cocoa
1 1/2 tsp baking powder
1 1/2 tsp baking soda
1 tsp salt
2 eggs
1 C milk
1/2 C vegetable oil
2 tsp vanilla
1 C boiling water

1. Preheat oven to 350 degrees F.
2. Grease 2 9-inch baking pans with cooking spray. Put wax paper circles on the bottom of each pan and spray again (this will help to prevent crumbing). An easy way to make the circles is to fold a piece of wax paper in quarters and then twice on the diagonal. Make a single cut and then unfold into a circle!

3. Mix all dry ingrediants and then add eggs, milk, oil and vanilla, beating for 2 minutes on medium speed.
4. Stir in boiling water (batter will be thin).
5. Pour evenly into prepared pans and bake at 350 for 30 minutes or until a toothpick comes out clean.

6. Let cool for 10 minutes and then remove from pan and remove wax paper. Cool completely on wire racks with round side (top) facing up.

Chocolate Buttercream Icing
1 stick butter
2/3 C Hershey's Cocoa
3 C powdered sugar
1/3 C milk
1 tsp vanilla extract

1. Melt butter and stir in cocoa.
2. Add powdered sugar and milk alternately, beating to spreading consistency.
3. Stir in vanilla.
4. Frost cake immediately.

Cake Assembly
1. After cake layers are completely cool, level the bottom layer with a knife or cake leveler, to make a completely flat surface. I got this adjustable cake leveler at Michael's for around $3 and it was very helpful. "Sample" some of the cake you cut off...mmm...

2. Frost the top of the bottom layer and place the top layer on top. Try to use the minimum amount of icing to get a good coating to make sure that you have enough icing for the top and the sides.
3. Ice the top and the sides. I got a rotating base, which helps to smooth the icing around the sides.

4. Store the cake in the refrigerator until you are ready to decorate.

Wilton Decorator Icing
1/4 C solid vegetable shortening (Crisco with no trans fat)
1/2 stick butter, room temperature
1/2 tsp vanilla extract
2 C powdered sugar, sifted
1 tbsp milk

1. Cream butter and shortening with electric mixer.
2. Add vanilla.
3. Gradually add powdered sugar, beating on medium speed.
4. Add milk and beat on high speed until light and fluffy.
5. Separate into individual containers and add food coloring as desired. The best food coloring to use is solid food color (add dabs with a toothpick and then mix with an icing knife or spoon) since this will not dilute the icing like liquid food coloring.


6. Refrigerate before using (overnight is good).

Cake Decorating
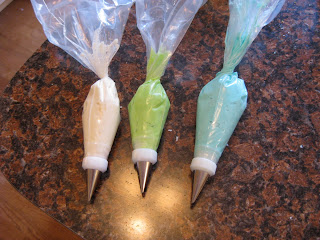
Sometime in the mid 1980's, my mom took a Wilton cake decorating class and bought a set of bags, tips and couplers. She always made my birthday cakes growing up, and I learned to use the set by playing around with the extra icing and making designs on tupperware lids. I slowly progressed to decorating cookies and cakes. I got my own Wilton set as a shower present from my mom, so I am now equipped to do decorating of my own. I have been watching a lot of youtube videos to learn new decorating techniques. I will list the basic steps here, but if you are really interested in cake decorating, I would be more than happy to give lessons. :-)

1. Load decorating bags with desired tips. There are different types of tips for different decorations- round ones of different sizes for writing and dots, "star" tips, "leaf" tips and even "rose tips." For the cake, I used "3" tips for the writing, "2" tips for the detail work, a "16" tip for the small stars and a "21" tip for the big stars and shell border. You can easily switch the tip so don't feel like you have to use only one tip per color.

2. Decorate the cake. It's a good idea to practice a bit on a lid or plate to see what the tip looks like, the effect of different pressure, etc. Use a 45 degree angle for writing and a 90 degree angle for stars. These are the two most basic tips and a great place to start. Make sure to work quickly and put the icing back in the refrigerator if the icing gets to runny.

3. Use the extra icing to practice your technique. I made a plate for my mom and dad who were visiting to wish them "Happy March 20th" (the day that they met 30 years ago). I was trying to practice roses, but the icing was not stiff enough, so they didn't turn out that well...I also still need to master leaves.

4. Wow your friends and family with your homemade, personalized layer cake!

Difficulty: Hard and requires a lot of time and specialized equipment but worth every second.
Debbie's Rating: 10
Hirsh's Rating: 10
Shari and Rick's Rating (aka Mom and Dad): 10

Tuesday, March 23, 2010

Homemade Ice Cream

Hirsh and I got an ice cream attachment for our KitchenAid stand mixer for our wedding. An ice cream maker isn't a kitchen standard by any means, but it is certainly fun to have, and I was excited to learn how to make homemade ice cream. For the first time, I used the recipe that came with the mixer. It turned out great, but it was REALLY rich and had a whopping 8 egg yolks and 2.5 cups of heavy cream, making it pretty unhealthy. For my next attempt, I tried to dramatically reduce the fat, switching to egg-less Philadelphia style ice cream made with half and half and whole milk- the result was something closer to italian ice than ice cream. For my third try, I modified an Alton Brown recipe to get an ice cream that was smooth and creamy but relatively low in fat. This was a great success and it will now be my base ice cream recipe!

Homemade Ice Cream
2 C half and half (1 pint)
1 C heavy cream (half pint)
1 C skim milk
4 egg yolks
1 C sugar
2 tsp vanilla extract
1/2 C crushed oreos or other add-in

1. Combine half and half, heavy cream and skim milk in a saucepan and bring just to a simmer. Remove from the heat.
2. Whisk egg yolks until they lighten in color and gradually add sugar, whisking to combine.
3. Temper cream mixture into egg mixture, adding a little bit at a time until about 1/3 of cream has been added to eggs (do it slowly so the eggs don't become scrambled eggs!).
4. Add egg mixture back into cream mixture and heat over low-medium heat until the mixture coats the back of a spoon and reaches 170-175 degrees F.
5. Cool for 30 minutes and then stir in vanilla.

6. Refrigerate overnight.
7. The next day, add mixture to ice cream maker and churn for 25-30 minutes. Add 1/2 C crushed oreo cookies (or mix-in of choice) in the last 3 minutes.

*If you are using the KitchenAid attachment, freeze the bowl the night before when you make the ice cream base.
8. Remove from ice cream maker and store in an airtight container in the freezer overnight to finish hardening (it comes out of the ice cream maker as a soft serve).


Difficulty: Hard, requires a lot of equipment
Debbie's Rating: 10
Hirsh's Rating: 10

It's definitely not any cheaper than buying store bought ice cream, and it takes a lot of time, but it is certainly fun to make and it tastes delicious! I think our next "mix in" will be peanut butter cups!

Friday, March 19, 2010

Chicken with Orzo


About a month ago, I received a magazine in the mail called "Cook's Country." I had no idea where it was from, but it turned out to be a great magazine. They had a lot of "test kitchen" recipe articles where they develop a recipe or a new way to make something, product/ equipment reviews and a bunch of tear out cards for 30 minute meals. (Turns out that the magazine subscription was from our Real Estate agent! He got Hirsh a year of "Handyman Magazine" and "Cook's Country" for me.) I decided it would be fun to try their "Chicken and Orzo" recipe. I think it took a bit longer than 30 minutes, but it turned out really well, so I will definitely make it again.

Chicken with Orzo
2-3 deboned chicken breasts (I made it with 2 but there was plenty of orzo for 3 portions)
1/2 tsp dried oregano
1/4 tsp red pepper flakes
1/4 tsp kosher salt
1/4 tsp pepper
1 C orzo
2 tsp olive oil
3 garlic cloves, minced
1 1/2 C low sodium chicken broth
1 14.5 oz container petite diced tomatoes

1. Pound chicken and dry off with a paper towel.
2. Combine oregano, red pepper flakes, pepper and salt and use to season chicken, rubbing in on both sides.

3. Toast orzo in non-stick 12 inch skillet over medium high heat for 5 minutes until golden brown (I didn't think it was going to turn brown but you just have to be patient!)
4. Remove orzo to bowl.
5. Add 1 tsp olive oil to skillet and brown chicken 3 minutes per side. Remove to plate.

6. Add another tsp olive oil to skillet, quickly toss garlic until fragrant and then add chicken broth and tomatoes.
7. Bring to a boil and then add orzo and chicken and simmer covered for 10-12 minutes on medium low heat until orzo is tender, chicken is cooked through and most of the liquid is evaporated.
*I thought there was a little too much liquid in the final dish, so I used my baster to remove some...in the future, I would probably drain part of the liquid from the tomatoes before I add them.
8. Serve! Makes about 3 portions.

Difficulty: Medium
Hirsh's Rating: 9
Debbie's Rating: 9- I would probably use a little less pepper next time- it had quite a pepper kick! I would also consider making the orzo alone as a side dish since it was my favorite part.

Sunday, March 14, 2010

Salmon with Lemon and Dill


I am always looking for new ways to prepare fish, and I found this recipe on allrecipes.com. I modified it based on the reviews and our tastes. This was the first time that I "tented" fish and it turned out really moist, so I will definitely try this cooking method again. I also really liked this recipe because I didn't need to marinate the fish prior to cooking, which saves a lot of time.

0.75-1 lb salmon filet
2 tbsp butter
Juice of 1 lemon
1 clove of garlic, minced
1 tsp dried dill weed.
Kosher salt
Pepper

1. Preheat oven to 350 degrees.
2. Spray a long piece of aluminum foil with cooking spray, lay down fish and put in a glass baking dish.
3. Melt butter and add lemon juice, garlic and dill.
* Hirsh bought me a garlic press for Valentine's day (my request) and I LOVE it. I felt like I could never get garlic minced well with a knife, and the press makes it fast and easy, not to mention my fingers are much less stinky!
4. Salt fish with a pinch of kosher salt and pour on sauce, making sure to turn up edges of foil to catch the sauce. Add a few grinds of pepper.

5. Tent the fish in alumnium foil, making sure to crimp the edges (tight, but not too tight).

6. Bake at 350 for 25-30 minutes or until fish flakes with a fork.

7. Optional: Use leftover marinade as a sauce for angel hair pasta or rice to complement the fish!

Difficulty: Easy
Debbie's Rating: 8- dill is a little too "grassy" for me. I would be interested to try it with some fresh basil instead.
Hirsh's Rating: 8.5


Wednesday, March 10, 2010

Ricotta Pasta


This recipe was inspired by my desire to find something to do with the other half container of ricotta that was left after making an 8x8 dish of baked ziti. I found a recipe on bettycrocker.com and modified it to our tastes. The sauce is simple, quick and delicious and is complemented by a variety of different add ins, so it is very good way to use up leftover veggies in the fridge!

Ricotta Pasta
7 oz fettucini rigate
3/4 C part skim ricotta
1/2 C grated parmesan
3 tbsp butter (smart balance)
Salt
Pepper
Garlic powder
Add ins like broccoli, roasted red pepper, mushrooms, cherry tomatoes, chicken, etc.

1. Boil pasta according to package directions and drain. (Note, I really like fettucini rigate for this recipe because the ridges help the sauce stick better than plain fettucini)
2. Melt butter in the pot you just cooked the pasta in, add parmesan and ricotta and stir until smooth.
3. Add few shakes each of salt, pepper and garlic powder.
4. Return pasta to pot and coat with sauce.
5. Add add ins of choice and heat through. I added broccoli, roasted red pepper and breaded chicken.
6. Serve! Makes two hearty dinner portions and one lunch portion.

Difficulty: Easy
Debbie's Rating: 9.5
Hirsh's Rating: 9

Thursday, March 4, 2010

Trader Joe's Pizza Dough

I wasn't planning on blogging about my experience with Trader Joe's pizza dough since it didn't seem that exciting, but after trying it out, I decided that it was worth reporting on. One of our standard quick dinners is "homemade" pizza. We usually buy a Boboli pizza crust and add marinara sauce spiked with a bit of oregano, a variety of cheeses (usually part skim mozzarella, cheddar and feta if we have it on hand) and any other fun toppings we have around. We make it on our pizza stone that we got for our wedding and it makes a very tasty, crisp crust.

Recently, I decided that it would be fun to try Trader Joe's pre-made pizza dough. I'm a big fan of Trader Joe's products in general, so I was very excited to try it, and plus, it's only 99 cents for a ball of dough. I got the garlic and herb kind. The first major problem was that the dough was VERY STICKY. Adding flour helped, but it was still difficult to work with. Next came the stretching. Stretching out the dough to a uniform thickness, proved to be almost impossible. It took me almost 20 minutes to get it into a somewhat uniform round shape and it was especially frustrating since it kept scrunching back together even after I stretched it or getting holes where it was too thin.

I did some research online and found that people got the best results when they pre-baked the dough and then added the toppings (otherwise it was very soggy). So I tried that- preheated pizza stone at 450 degrees for 20 minutes, prebaked dough for 8 minutes, added toppings, baked for 8 additional minutes. The result? Still chewy, soggy dough. Gross.

Even if the dough had turned out great, I would have still hesitated to use it again since it was so much work to prepare. Since it ended up with less than desirable consistency, I can say for sure that we will not be trying this again.

Did anyone have a similar experience? Or, have you found a dough that you love? I'd love to hear your thoughts!